Tutorial 13 : Normal Mapping
- Normal textures
- Tangent and Bitangent
- Preparing our VBO
- The shader
- Results
- Going further
- Exercises
- Tools & Links
- References
Welcome for our 13th tutorial ! Today we will talk about normal mapping.
Since Tutorial 8 : Basic shading, you know how to get decent shading using triangle normals. One caveat is that until now, we only had one normal per vertex : inside each triangle, they vary smoothly, on the opposite to the colour, which samples a texture. The basic idea of normal mapping is to give normals similar variations.
Normal textures
A “normal texture” looks like this :

In each RGB texel is encoded a XYZ vector : each colour component is between 0 and 1, and each vector component is between -1 and 1, so this simple mapping goes from the texel to the normal :
normal = (2*color)-1 // on each component
The texture has a general blue tone because overall, the normal is towards the “outside of the surface”. As usual, X is right in the plane of the texture, Y is up (again in the plane of the texture), thus given the right hand rule Z point to the “outside” of the plane of the texture.
This texture is mapped just like the diffuse one; the big problem is how to convert our normal, which is expressed in the space each individual triangle (tangent space, also called image space), in model space (since this is what is used in our shading equation).
Tangent and Bitangent
You are now so familiar with matrices that you know that in order to define a space (in our case, the tangent space), we need 3 vectors. We already have our UP vector : it’s the normal, given by Blender or computed from the triangle by a simple cross product. It’s represented in blue, just like the overall color of the normal map :
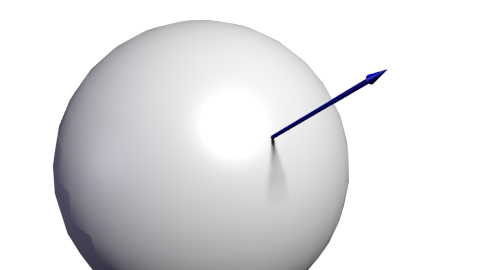
Next we need a tangent, T : a vector parallel to the surface. But there are many such vectors :
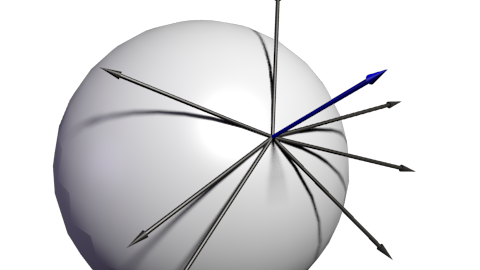
Which one should we choose ? In theory, any, but we have to be consistent with the neighbors to avoid introducing ugly edges. The standard method is to orient the tangent in the same direction that our texture coordinates :

Since we need 3 vectors to define a basis, we must also compute the bitangent B (which is any other tangent vector, but if everything is perpendicular, math is simpler) :
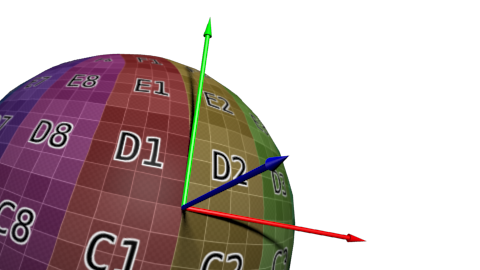
Here is the algorithm : if we note deltaPos1 and deltaPos2 two edges of our triangle, and deltaUV1 and deltaUV2 the corresponding differences in UVs, we can express our problem with the following equation :
deltaPos1 = deltaUV1.x * T + deltaUV1.y * B
deltaPos2 = deltaUV2.x * T + deltaUV2.y * B
Just solve this system for T and B, and you have your vectors ! (See code below)
Once we have our T, B, N vectors, we also have this nice matrix which enables us to go from Tangent Space to Model Space :

With this TBN matrix, we can transform normals (extracted from the texture) into model space. However, it’s usually done the other way around : transform everything from Model Space to Tangent Space, and keep the extracted normal as-is. All computations are done in Tangent Space, which doesn’t changes anything.
Do have this inverse transformation, we simply have to take the matrix inverse, which in this case (an orthogonal matrix, i.e each vector is perpendicular to the others. See “going further” below) is also its transpose, much cheaper to compute :
invTBN = transpose(TBN)
, i.e. :

Preparing our VBO
Computing the tangents and bitangents
Since we need our tangents and bitangents on top of our normals, we have to compute them for the whole mesh. We’ll do this in a separate function :
void computeTangentBasis(
    // inputs
    std::vector<glm::vec3> & vertices,
    std::vector<glm::vec2> & uvs,
    std::vector<glm::vec3> & normals,
    // outputs
    std::vector<glm::vec3> & tangents,
    std::vector<glm::vec3> & bitangents
){
For each triangle, we compute the edge (deltaPos) and the deltaUV
    for ( int i=0; i<vertices.size(); i+=3){

        // Shortcuts for vertices
        glm::vec3 & v0 = vertices[i+0];
        glm::vec3 & v1 = vertices[i+1];
        glm::vec3 & v2 = vertices[i+2];

        // Shortcuts for UVs
        glm::vec2 & uv0 = uvs[i+0];
        glm::vec2 & uv1 = uvs[i+1];
        glm::vec2 & uv2 = uvs[i+2];

        // Edges of the triangle : position delta
        glm::vec3 deltaPos1 = v1-v0;
        glm::vec3 deltaPos2 = v2-v0;

        // UV delta
        glm::vec2 deltaUV1 = uv1-uv0;
        glm::vec2 deltaUV2 = uv2-uv0;
We can now use our formula to compute the tangent and the bitangent :
        float r = 1.0f / (deltaUV1.x * deltaUV2.y - deltaUV1.y * deltaUV2.x);
        glm::vec3 tangent = (deltaPos1 * deltaUV2.y   - deltaPos2 * deltaUV1.y)*r;
        glm::vec3 bitangent = (deltaPos2 * deltaUV1.x   - deltaPos1 * deltaUV2.x)*r;
Finally, we fill the *tangents *and *bitangents *buffers. Remember, these buffers are not indexed yet, so each vertex has its own copy.
        // Set the same tangent for all three vertices of the triangle.
        // They will be merged later, in vboindexer.cpp
        tangents.push_back(tangent);
        tangents.push_back(tangent);
        tangents.push_back(tangent);

        // Same thing for bitangents
        bitangents.push_back(bitangent);
        bitangents.push_back(bitangent);
        bitangents.push_back(bitangent);

    }
Indexing
Indexing our VBO is very similar to what we used to do, but there is a subtle difference.
If we find a similar vertex (same position, same normal, same texture coordinates), we don’t want to use its tangent and bitangent too ; on the contrary, we want to average them. So let’s modify our old code a bit :
        // Try to find a similar vertex in out_XXXX
        unsigned int index;
        bool found = getSimilarVertexIndex(in_vertices[i], in_uvs[i], in_normals[i],     out_vertices, out_uvs, out_normals, index);

        if ( found ){ // A similar vertex is already in the VBO, use it instead !
            out_indices.push_back( index );

            // Average the tangents and the bitangents
            out_tangents[index] += in_tangents[i];
            out_bitangents[index] += in_bitangents[i];
        }else{ // If not, it needs to be added in the output data.
            // Do as usual
            [...]
        }
Note that we don’t normalize anything here. This is actually handy, because this way, small triangles, which have smaller tangent and bitangent vectors, will have a weaker effect on the final vectors than big triangles (which contribute more to the final shape).
The shader
Additional buffers & uniforms
We need two new buffers : one for the tangents, and one for the bitangents :
    GLuint tangentbuffer;
    glGenBuffers(1, &tangentbuffer);
    glBindBuffer(GL_ARRAY_BUFFER, tangentbuffer);
    glBufferData(GL_ARRAY_BUFFER, indexed_tangents.size() * sizeof(glm::vec3), &indexed_tangents[0], GL_STATIC_DRAW);

    GLuint bitangentbuffer;
    glGenBuffers(1, &bitangentbuffer);
    glBindBuffer(GL_ARRAY_BUFFER, bitangentbuffer);
    glBufferData(GL_ARRAY_BUFFER, indexed_bitangents.size() * sizeof(glm::vec3), &indexed_bitangents[0], GL_STATIC_DRAW);
We also need a new uniform for our new normal texture :
    [...]
    GLuint NormalTexture = loadTGA_glfw("normal.tga");
    [...]
    GLuint NormalTextureID  = glGetUniformLocation(programID, "NormalTextureSampler");
And one for the 3x3 ModelView matrix. This is strictly speaking not necessary, but it’s easier ; more about this later. We just need the 3x3 upper-left part because we will multiply directions, so we can drop the translation part.
GLuint ModelView3x3MatrixID = glGetUniformLocation(programID, "MV3x3");
So the full drawing code becomes :
        // Clear the screen
        glClear(GL_COLOR_BUFFER_BIT | GL_DEPTH_BUFFER_BIT);

        // Use our shader
        glUseProgram(programID);

        // Compute the MVP matrix from keyboard and mouse input
        computeMatricesFromInputs();
        glm::mat4 ProjectionMatrix = getProjectionMatrix();
        glm::mat4 ViewMatrix = getViewMatrix();
        glm::mat4 ModelMatrix = glm::mat4(1.0);
        glm::mat4 ModelViewMatrix = ViewMatrix * ModelMatrix;
        glm::mat3 ModelView3x3Matrix = glm::mat3(ModelViewMatrix); // Take the upper-left part of ModelViewMatrix
        glm::mat4 MVP = ProjectionMatrix * ViewMatrix * ModelMatrix;

        // Send our transformation to the currently bound shader,
        // in the "MVP" uniform
        glUniformMatrix4fv(MatrixID, 1, GL_FALSE, &MVP[0][0]);
        glUniformMatrix4fv(ModelMatrixID, 1, GL_FALSE, &ModelMatrix[0][0]);
        glUniformMatrix4fv(ViewMatrixID, 1, GL_FALSE, &ViewMatrix[0][0]);
        glUniformMatrix4fv(ViewMatrixID, 1, GL_FALSE, &ViewMatrix[0][0]);
        glUniformMatrix3fv(ModelView3x3MatrixID, 1, GL_FALSE, &ModelView3x3Matrix[0][0]);

        glm::vec3 lightPos = glm::vec3(0,0,4);
        glUniform3f(LightID, lightPos.x, lightPos.y, lightPos.z);

        // Bind our diffuse texture in Texture Unit 0
        glActiveTexture(GL_TEXTURE0);
        glBindTexture(GL_TEXTURE_2D, DiffuseTexture);
        // Set our "DiffuseTextureSampler" sampler to user Texture Unit 0
        glUniform1i(DiffuseTextureID, 0);

        // Bind our normal texture in Texture Unit 1
        glActiveTexture(GL_TEXTURE1);
        glBindTexture(GL_TEXTURE_2D, NormalTexture);
        // Set our "Normal    TextureSampler" sampler to user Texture Unit 0
        glUniform1i(NormalTextureID, 1);

        // 1rst attribute buffer : vertices
        glEnableVertexAttribArray(0);
        glBindBuffer(GL_ARRAY_BUFFER, vertexbuffer);
        glVertexAttribPointer(
            0,                  // attribute
            3,                  // size
            GL_FLOAT,           // type
            GL_FALSE,           // normalized?
            0,                  // stride
            (void*)0            // array buffer offset
        );

        // 2nd attribute buffer : UVs
        glEnableVertexAttribArray(1);
        glBindBuffer(GL_ARRAY_BUFFER, uvbuffer);
        glVertexAttribPointer(
            1,                                // attribute
            2,                                // size
            GL_FLOAT,                         // type
            GL_FALSE,                         // normalized?
            0,                                // stride
            (void*)0                          // array buffer offset
        );

        // 3rd attribute buffer : normals
        glEnableVertexAttribArray(2);
        glBindBuffer(GL_ARRAY_BUFFER, normalbuffer);
        glVertexAttribPointer(
            2,                                // attribute
            3,                                // size
            GL_FLOAT,                         // type
            GL_FALSE,                         // normalized?
            0,                                // stride
            (void*)0                          // array buffer offset
        );

        // 4th attribute buffer : tangents
        glEnableVertexAttribArray(3);
        glBindBuffer(GL_ARRAY_BUFFER, tangentbuffer);
        glVertexAttribPointer(
            3,                                // attribute
            3,                                // size
            GL_FLOAT,                         // type
            GL_FALSE,                         // normalized?
            0,                                // stride
            (void*)0                          // array buffer offset
        );

        // 5th attribute buffer : bitangents
        glEnableVertexAttribArray(4);
        glBindBuffer(GL_ARRAY_BUFFER, bitangentbuffer);
        glVertexAttribPointer(
            4,                                // attribute
            3,                                // size
            GL_FLOAT,                         // type
            GL_FALSE,                         // normalized?
            0,                                // stride
            (void*)0                          // array buffer offset
        );

        // Index buffer
        glBindBuffer(GL_ELEMENT_ARRAY_BUFFER, elementbuffer);

        // Draw the triangles !
        glDrawElements(
            GL_TRIANGLES,      // mode
            indices.size(),    // count
            GL_UNSIGNED_INT,   // type
            (void*)0           // element array buffer offset
        );

        glDisableVertexAttribArray(0);
        glDisableVertexAttribArray(1);
        glDisableVertexAttribArray(2);
        glDisableVertexAttribArray(3);
        glDisableVertexAttribArray(4);

        // Swap buffers
        glfwSwapBuffers();
Vertex shader
As said before, we’ll do everything in camera space, because it’s simpler to get the fragment’s position in this space. This is why we multiply our T,B,N vectors with the ModelView matrix.
    vertexNormal_cameraspace = MV3x3 * normalize(vertexNormal_modelspace);
    vertexTangent_cameraspace = MV3x3 * normalize(vertexTangent_modelspace);
    vertexBitangent_cameraspace = MV3x3 * normalize(vertexBitangent_modelspace);
These three vector define the TBN matrix, which is constructed this way :
    mat3 TBN = transpose(mat3(
        vertexTangent_cameraspace,
        vertexBitangent_cameraspace,
        vertexNormal_cameraspace
    )); // You can use dot products instead of building this matrix and transposing it. See References for details.
This matrix goes from camera space to tangent space (The same matrix, but with XXX_modelspace instead, would go from model space to tangent space). We can use it to compute the light direction and the eye direction, in tangent space :
    LightDirection_tangentspace = TBN * LightDirection_cameraspace;
    EyeDirection_tangentspace =  TBN * EyeDirection_cameraspace;
Fragment shader
Our normal, in tangent space, is really straightforward to get : it’s our texture :
    // Local normal, in tangent space
    vec3 TextureNormal_tangentspace = normalize(texture( NormalTextureSampler, UV ).rgb*2.0 - 1.0);
So we’ve got everything we need now. Diffuse lighting uses clamp( dot( n,l ), 0,1 ), with n and l expressed in tangent space (it doesn’t matter in which space you make your dot and cross products; the important thing is that n and l are both expressed in the same space). Specular lighting uses clamp( dot( E,R ), 0,1 ), again with E and R expressed in tangent space. Yay !
Results
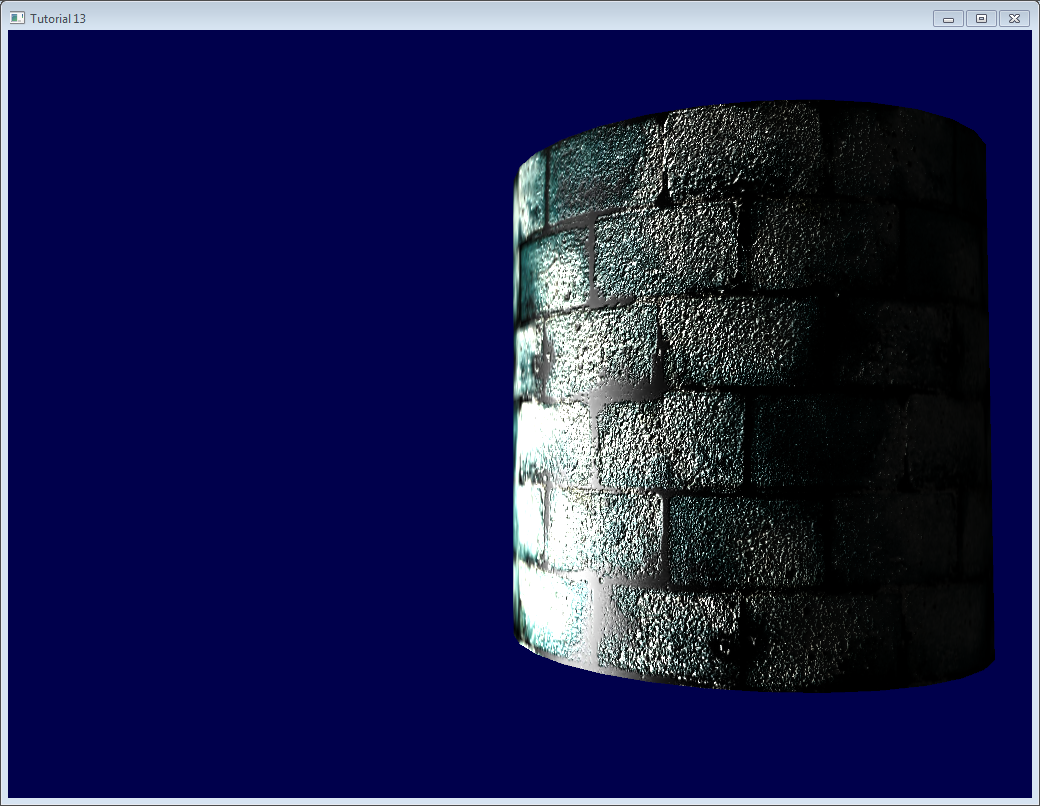
Here is our result so far. You can notice that :
- The bricks look bumpy because we have lots of variations in the normals
- Cement looks flat because the normal texture is uniformly blue
Going further
Orthogonalization
In our vertex shader we took the transpose instead of the inverse because it’s faster. But it only works if the space that the matrix represents is orthogonal, which is not yet the case. Luckily, this is very easy to fix : we just have to make the tangent perpendicular to the normal at he end of computeTangentBasis() :
t = glm::normalize(t - n * glm::dot(n, t));
This formula may be hard to grasp, so a little schema might help :

n and t are almost perpendicular, so we “push” t in the direction of -n by a factor of dot(n,t)
Here’s a little applet that explains it too (Use only 2 vectors).
Handedness
You usually don’t have to worry about that, but in some cases, when you use symmetric models, UVs are oriented in the wrong way, and your T has the wrong orientation.
To check whether it must be inverted or not, the check is simple : TBN must form a right-handed coordinate system, i.e. cross(n,t) must have the same orientation than b.
In mathematics, “Vector A has the same orientation as Vector B” translates as dot(A,B)>0, so we need to check if dot( cross(n,t) , b ) > 0.
If it’s false, just invert t :
if (glm::dot(glm::cross(n, t), b) < 0.0f){
     t = t * -1.0f;
 }
This is also done for each vertex at the end of computeTangentBasis().
Specular texture
Just for fun, I added a specular texture to the code. It looks like this :
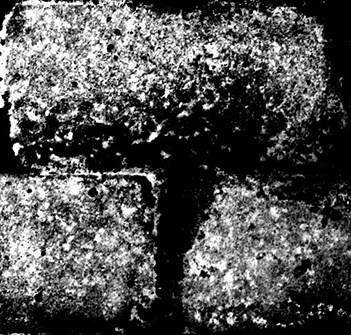
and is used instead of the simple “vec3(0.3,0.3,0.3)” grey that we used as specular color.
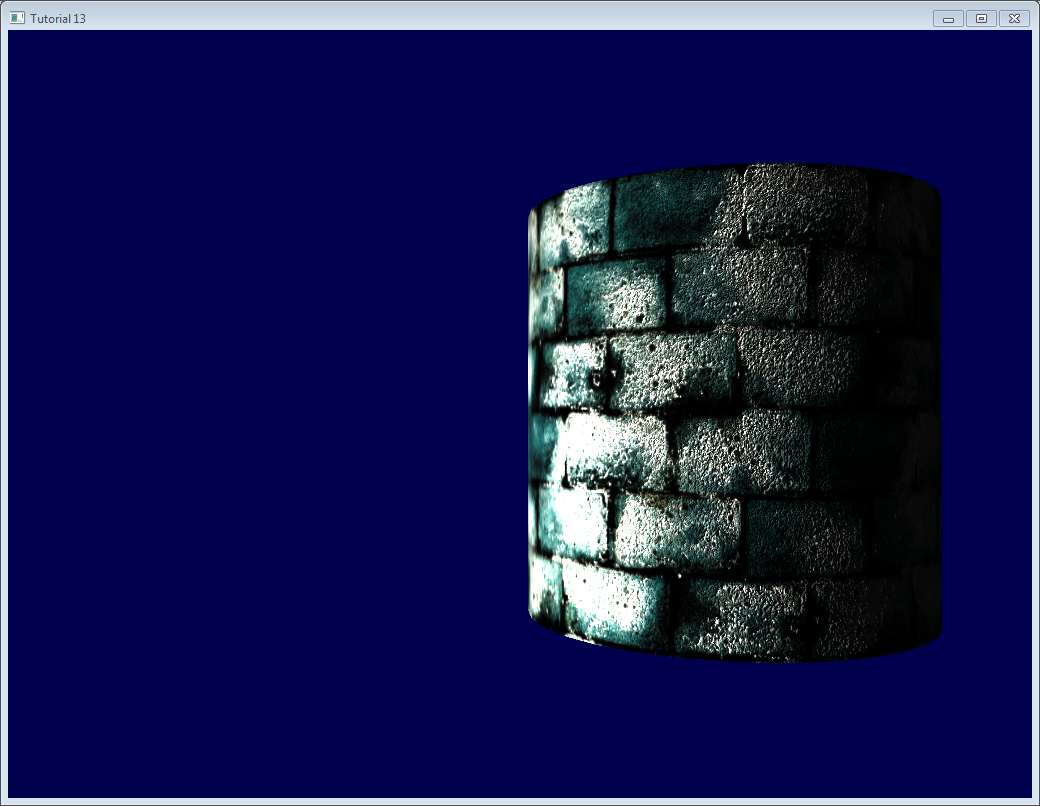
Notice that now, cement is always black : the texture says that it has no specular component.
Debugging with the immediate mode
The real aim of this website is that you DON’T use immediate mode, which is deprecated, slow, and problematic in many aspects.
However, it also happens to be really handy for debugging :
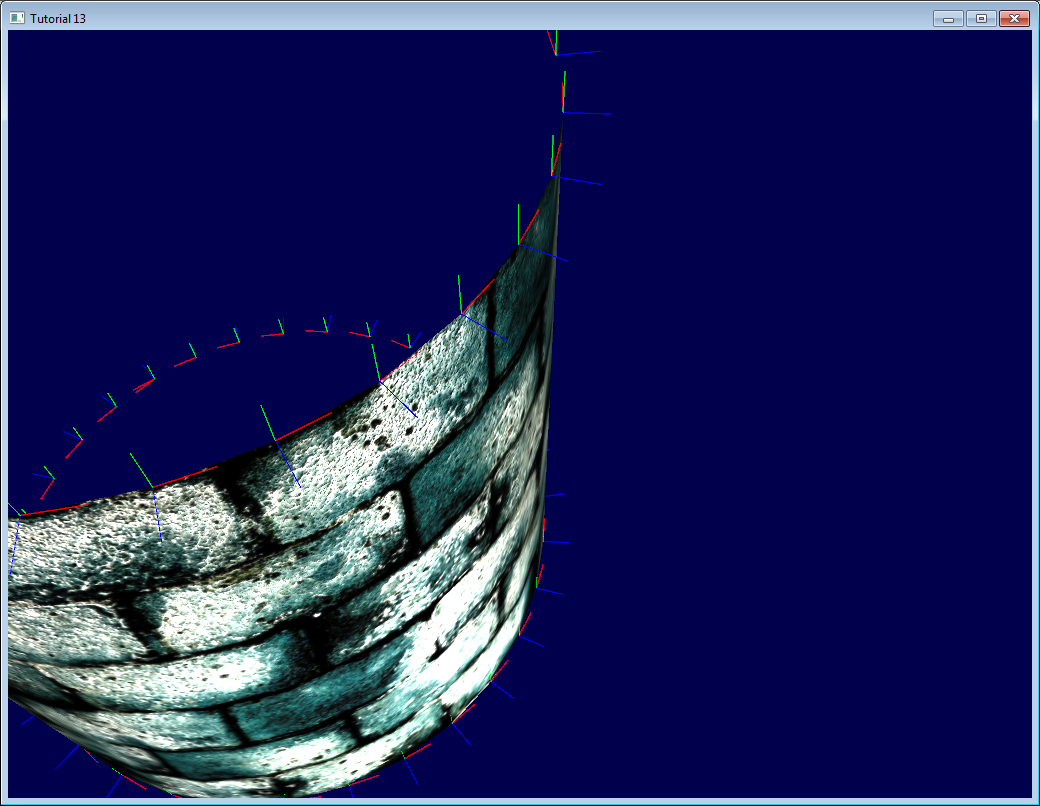
Here we visualize our tangent space with lines drawn in immediate mode.
For this, you need to abandon the 3.3 core profile :
glfwOpenWindowHint(GLFW_OPENGL_PROFILE, GLFW_OPENGL_COMPAT_PROFILE);
then give our matrices to OpenGL’s old-school pipeline (you can write another shader too, but it’s simpler this way, and you’re hacking anyway) :
glMatrixMode(GL_PROJECTION);
glLoadMatrixf((const GLfloat*)&ProjectionMatrix[0]);
glMatrixMode(GL_MODELVIEW);
glm::mat4 MV = ViewMatrix * ModelMatrix;
glLoadMatrixf((const GLfloat*)&MV[0]);
Disable shaders :
glUseProgram(0);
And draw your lines (in this case, normals, normalized and multiplied by 0.1, and applied at the correct vertex) :
glColor3f(0,0,1);
glBegin(GL_LINES);
for (int i=0; i<indices.size(); i++){
    glm::vec3 p = indexed_vertices[indices[i]];
    glVertex3fv(&p.x);
    glm::vec3 o = glm::normalize(indexed_normals[indices[i]]);
    p+=o*0.1f;
    glVertex3fv(&p.x);
}
glEnd();
Remember : don’t use immediate mode in real world ! Only for debugging ! And don’t forget to re-enable the core profile afterwards, it will make sure that you don’t do such things.
Debugging with colors
When debugging, it can be useful to visualize the value of a vector. The easiest way to do this is to write it on the framebuffer instead of the actual colour. For instance, let’s visualize LightDirection_tangentspace :
color.xyz = LightDirection_tangentspace;
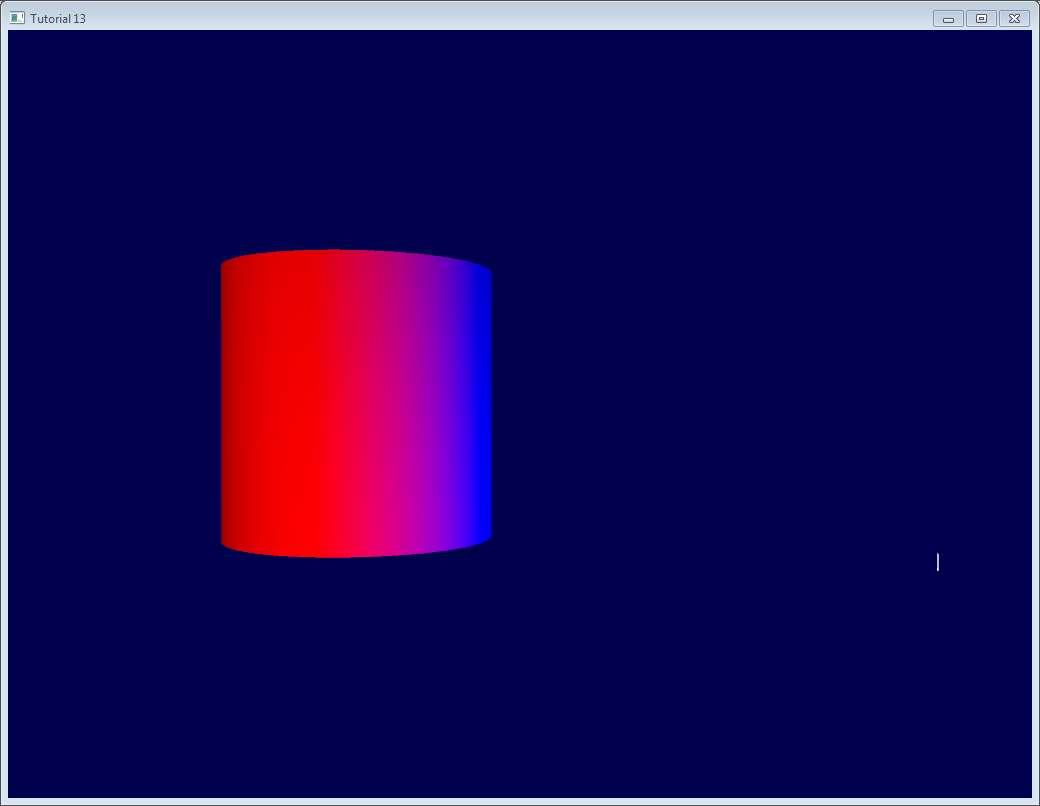
This means :
- On the right part of the cylinder, the light (represented by the small white line) is UP (in tangent space). In other words, the light is in the direction of the normal of the triangles.
- On the middle part of the cylinder, the light is in the direction of the tangent (towards +X)
A few tips :
- Depending on what you’re trying to visualize, you may want to normalize it.
- If you can’t make sense of what you’re seeing, visualize all components separately by forcing for instance green and blue to 0.
- Avoid messing with alpha, it’s too complicated :)
- If you want to visualize negative value, you can use the same trick that our normal textures use : visualize (v+1.0)/2.0 instead, so that black means -1 and full color means +1. It’s hard to understand what you see, though.
Debugging with variable names
As already stated before, it’s crucial to exactly know in which space your vectors are. Don’t take the dot product of a vector in camera space and a vector in model space.
Appending the space of each vector in their names (“…_modelspace”) helps fixing math bugs tremendously.
How to create a normal map
Created by James O’Hare. Click to enlarge.

Exercises
- Normalize the vectors in indexVBO_TBN before the addition and see what it does.
- Visualize other vectors (for instance, EyeDirection_tangentspace) in color mode, and try to make sense of what you see
Tools & Links
- Crazybump , a great tool to make normal maps. Not free.
- Nvidia’s photoshop plugin. Free, but photoshop isn’t…
- Make your own normal maps out of several photos
- Make your own normal maps out of one photo
- Some more info on matrix transpose