第五课:带纹理的立方体
本课学习如下几点:
- 什么是UV坐标
- 怎样自行加载纹理
- 怎样在OpenGL中使用纹理
- 什么是过滤?什么是mipmap?怎样使用?
- 怎样利用GLFW更加鲁棒地加载纹理?
- 什么是alpha通道?
关于UV坐标
给模型贴纹理时,我们需要通过UV坐标来告诉OpenGL用哪块图像填充三角形。
每个顶点除了位置坐标外还有两个浮点数坐标:U和V。这两个坐标用于访问纹理,如下图所示:
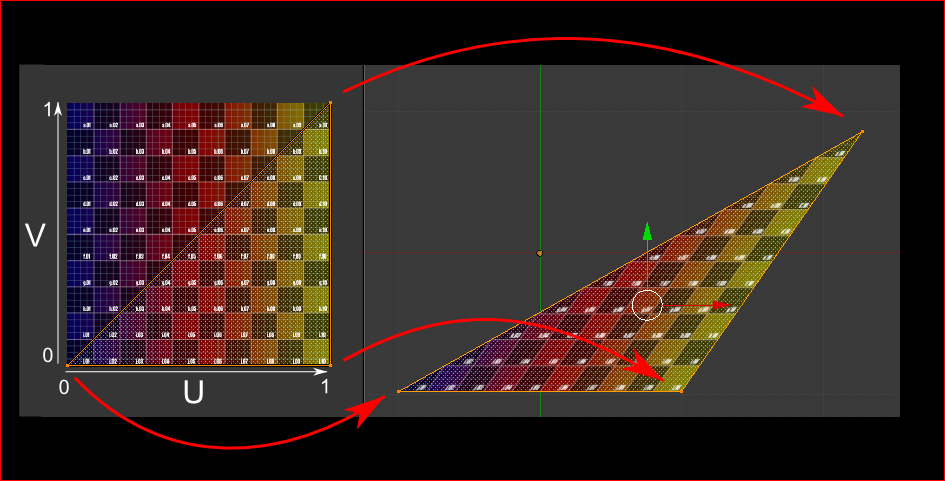
注意观察纹理是怎样在三角形上扭曲的。
自行加载.BMP图片
不用花太多心思了解BMP文件格式:很多库可以帮你加载BMP文件。但BMP格式极为简单,可以帮助你理解那些库的工作原理。所以,我们从头开始写一个BMP文件加载器,不过千万别在实际工程中使用这个实验品。
如下是加载函数的声明:
GLuint loadBMP_custom(const char * imagepath);
使用方式如下:
GLuint image = loadBMP_custom("./my_texture.bmp");
接下来看看如何读取BMP文件。
首先需要一些数据。读取文件时将设置这些变量。
// Data read from the header of the BMP file
unsigned char header[54]; // Each BMP file begins by a 54-bytes header
unsigned int dataPos;     // Position in the file where the actual data begins
unsigned int width, height;
unsigned int imageSize;   // = width*height*3
// Actual RGB data
unsigned char * data;
现在正式开始打开文件。
// Open the file
FILE * file = fopen(imagepath,"rb");
if (!file)
{
    printf("Image could not be openedn");
    return 0;
}
文件一开始是54字节长的文件头,用于标识”这是不是一个BMP文件”、图像大小、像素位等等。来读取文件头吧:
if ( fread(header, 1, 54, file)!=54 ){ // If not 54 bytes read : problem
    printf("Not a correct BMP filen");
    return false;
}
文件头总是以”BM”开头。实际上,如果用十六进制编辑器打开BMP文件,您会看到如下情形:

因此得检查一下头两个字节是否确为‘B’和‘M’:
if ( header[0]!='B' || header[1]!='M' ){
    printf("Not a correct BMP filen");
    return 0;
}
现在可以读取文件中图像大小、数据位置等信息了:
// Read ints from the byte array
dataPos    = *(int*)&(header[0x0A]);
imageSize  = *(int*)&(header[0x22]);
width      = *(int*)&(header[0x12]);
height     = *(int*)&(header[0x16]);
如果这些信息缺失,您得手动补齐:
// Some BMP files are misformatted, guess missing information
if (imageSize==0)    imageSize=width*height*3; // 3 : one byte for each Red, Green and Blue component
if (dataPos==0)      dataPos=54; // The BMP header is done that way
现在我们知道了图像的大小,可以为之分配一些内存,把图像读进去:
// Create a buffer
data = new unsigned char [imageSize];

// Read the actual data from the file into the buffer
fread(data,1,imageSize,file);

//Everything is in memory now, the file can be closed
fclose(file);
到了真正的OpenGL部分了。创建纹理和创建顶点缓冲差不多:创建一个纹理、绑定、填充、配置。
在glTexImage2D函数中,GL_RGB表示颜色由三个分量构成,GL_BGR则说明了颜色在内存中的存储格式。实际上,BMP存储的并不是RGB,而是BGR,因此得把这个告诉OpenGL。
// Create one OpenGL texture
GLuint textureID;
glGenTextures(1, &textureID);

// "Bind" the newly created texture : all future texture functions will modify this texture
glBindTexture(GL_TEXTURE_2D, textureID);

// Give the image to OpenGL
glTexImage2D(GL_TEXTURE_2D, 0,GL_RGB, width, height, 0, GL_BGR, GL_UNSIGNED_BYTE, data);

glTexParameteri(GL_TEXTURE_2D, GL_TEXTURE_MAG_FILTER, GL_NEAREST);
glTexParameteri(GL_TEXTURE_2D, GL_TEXTURE_MIN_FILTER, GL_NEAREST);
稍后再解释最后两行代码。同时,得在C++代码中使用刚写好的函数加载一个纹理:
GLuint Texture = loadBMP_custom("uvtemplate.bmp");
另外十分重要的一点:** 使用2次幂(power-of-two)的纹理!**
- 优质纹理: 128128, 256256, 10241024, 2*2…
- 劣质纹理: 127128, 35, …
- 勉强可以但很怪异的纹理: 128*256
在OpenGL中使用纹理
先来看看片段着色器。大部分代码一目了然:
#version 330 core

// Interpolated values from the vertex shaders
in vec2 UV;

// Ouput data
out vec3 color;

// Values that stay constant for the whole mesh.
uniform sampler2D myTextureSampler;

void main(){

    // Output color = color of the texture at the specified UV
    color = texture( myTextureSampler, UV ).rgb;
}
注意三点:
- 片段着色器需要UV坐标。看似合情合理。
- 同时也需要一个”Sampler2D”来获知要加载哪一个纹理(同一个着色器中可以访问多个纹理)
- 最后一点,用texture()访问纹理,该方法返回一个(R,G,B,A)的vec4变量。马上就会了解到分量A。
顶点着色器也很简单,只需把UV坐标传给片段着色器:
#version 330 core

// Input vertex data, different for all executions of this shader.
layout(location = 0) in vec3 vertexPosition_modelspace;
layout(location = 1) in vec2 vertexUV;

// Output data ; will be interpolated for each fragment.
out vec2 UV;

// Values that stay constant for the whole mesh.
uniform mat4 MVP;

void main(){

    // Output position of the vertex, in clip space : MVP * position
    gl_Position =  MVP * vec4(vertexPosition_modelspace,1);

    // UV of the vertex. No special space for this one.
    UV = vertexUV;
}
还记得第四课中的”layout(location = 1) in vec2 vertexUV”吗?我们得在这儿把相同的事情再做一遍,但这次的缓冲中放的不是(R,G,B)三元组,而是(U,V)数对。
// Two UV coordinatesfor each vertex. They were created with Blender. You'll learn shortly how to do this yourself.
static const GLfloat g_uv_buffer_data[] = {
    0.000059f, 1.0f-0.000004f,
    0.000103f, 1.0f-0.336048f,
    0.335973f, 1.0f-0.335903f,
    1.000023f, 1.0f-0.000013f,
    0.667979f, 1.0f-0.335851f,
    0.999958f, 1.0f-0.336064f,
    0.667979f, 1.0f-0.335851f,
    0.336024f, 1.0f-0.671877f,
    0.667969f, 1.0f-0.671889f,
    1.000023f, 1.0f-0.000013f,
    0.668104f, 1.0f-0.000013f,
    0.667979f, 1.0f-0.335851f,
    0.000059f, 1.0f-0.000004f,
    0.335973f, 1.0f-0.335903f,
    0.336098f, 1.0f-0.000071f,
    0.667979f, 1.0f-0.335851f,
    0.335973f, 1.0f-0.335903f,
    0.336024f, 1.0f-0.671877f,
    1.000004f, 1.0f-0.671847f,
    0.999958f, 1.0f-0.336064f,
    0.667979f, 1.0f-0.335851f,
    0.668104f, 1.0f-0.000013f,
    0.335973f, 1.0f-0.335903f,
    0.667979f, 1.0f-0.335851f,
    0.335973f, 1.0f-0.335903f,
    0.668104f, 1.0f-0.000013f,
    0.336098f, 1.0f-0.000071f,
    0.000103f, 1.0f-0.336048f,
    0.000004f, 1.0f-0.671870f,
    0.336024f, 1.0f-0.671877f,
    0.000103f, 1.0f-0.336048f,
    0.336024f, 1.0f-0.671877f,
    0.335973f, 1.0f-0.335903f,
    0.667969f, 1.0f-0.671889f,
    1.000004f, 1.0f-0.671847f,
    0.667979f, 1.0f-0.335851f
};
上述UV坐标对应于下面的模型:
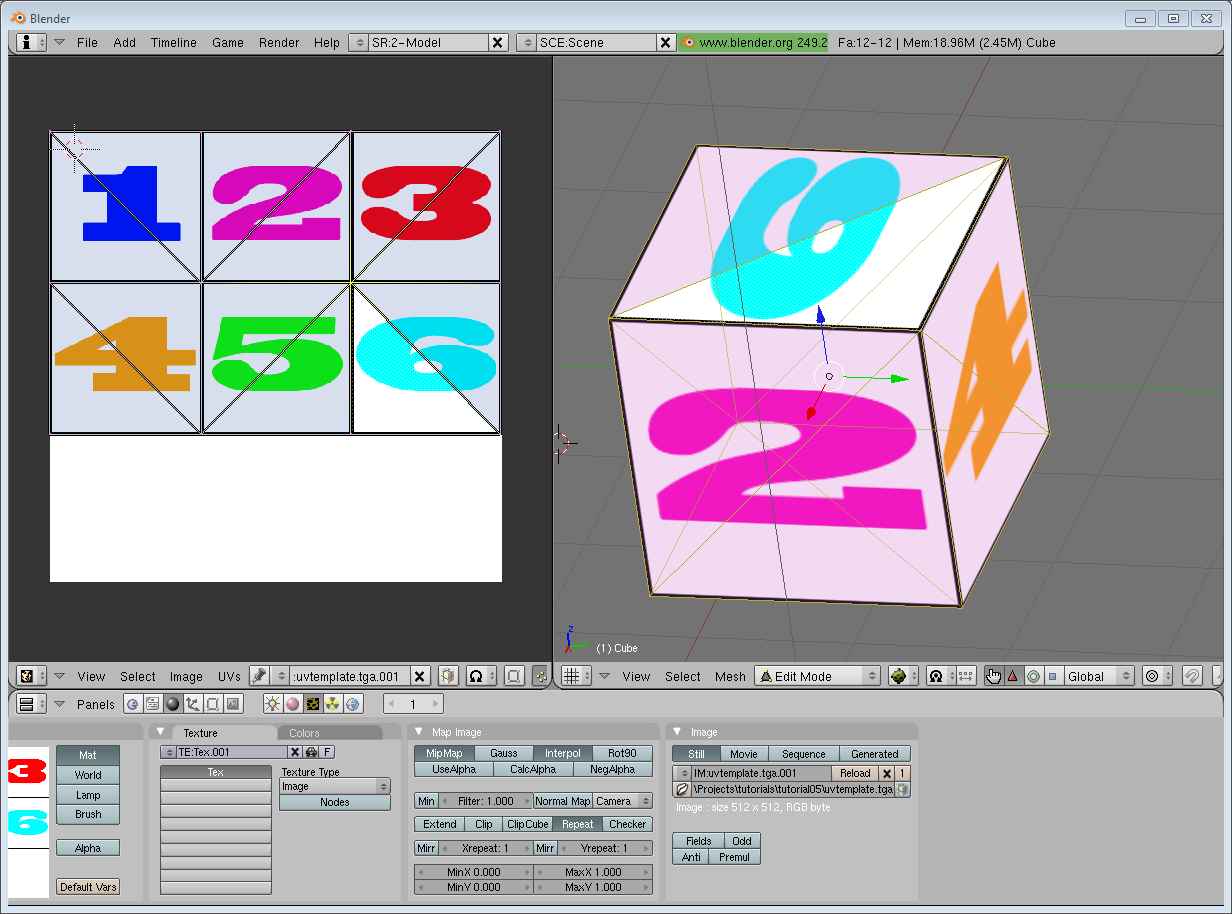
其余的就很清楚了。创建一个缓冲、绑定、填充、配置,像往常一样绘制顶点缓冲对象。要注意把glVertexAttribPointer的第二个参数(大小)3改成2。
结果如下:

放大后:

什么是过滤和mipmap?怎样使用?
正如在上面截图中看到的,纹理质量不是很好。这是因为在loadBMP_custom函数中,有如下两行代码:
glTexParameteri(GL_TEXTURE_2D, GL_TEXTURE_MAG_FILTER, GL_NEAREST);
glTexParameteri(GL_TEXTURE_2D, GL_TEXTURE_MIN_FILTER, GL_NEAREST);
这意味着在片段着色器中,texture()将直接提取位于(U,V)坐标的纹素(texel)。
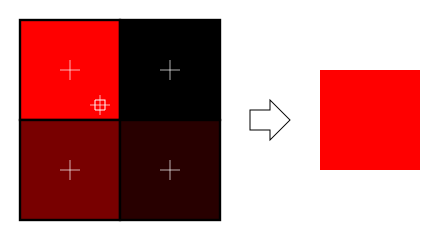
有几种方法可以改善这一状况。
线性过滤(Linear filtering)
若采用线性过滤。texture()会查看周围的纹素,然后根据UV坐标距离各纹素中心的距离来混合颜色。这就避免了前面看到的锯齿状边缘。
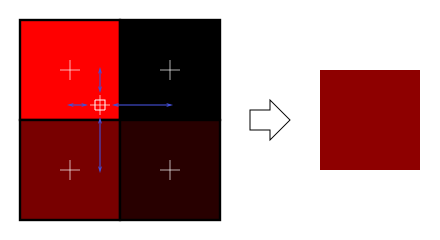
线性过滤可以显著改善纹理质量,应用的也很多。但若想获得更高质量的纹理,可以采用各向异性过滤,不过速度有些慢。
各向异性过滤(Anisotropic filtering)
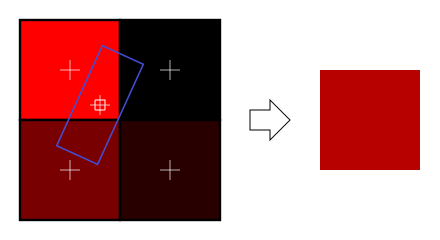
这种方法逼近了真正片断中的纹素区块。例如下图中稍稍旋转了的纹理,各向异性过滤将沿蓝色矩形框的主方向,作一定数量的采样(即所谓的”各向异性层级”),计算出其内的颜色。
Mipmaps
线性过滤和各向异性过滤都存在一个共同的问题。那就是如果从远处观察纹理,只对4个纹素作混合显得不够。实际上,如果3D模型位于很远的地方,屏幕上只看得见一个片断(像素),那计算平均值得出最终颜色值时,图像所有的纹素都应该考虑在内。很显然,这种做法没有考虑性能问题。撇开两种过滤方法不谈,这里要介绍的是mipmap技术:
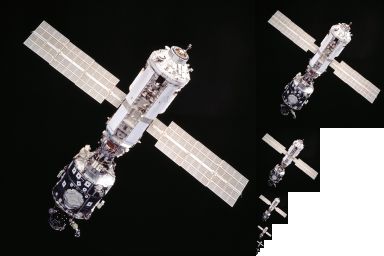
- 一开始,把图像缩小到原来的1/2,然后依次缩小,直到图像只有1x1大小(应该是图像所有纹素的平均值)
- 绘制模型时,根据纹素大小选择合适的mipmap。
- 可以选用nearest、linear、anisotropic等任意一种滤波方式来对mipmap采样。
- 要想效果更好,可以对两个mipmap采样然后混合,得出结果。
好在这个比较简单,OpenGL都帮我们做好了,只需一个简单的调用:
// When MAGnifying the image (no bigger mipmap available), use LINEAR filtering
glTexParameteri(GL_TEXTURE_2D, GL_TEXTURE_MAG_FILTER, GL_LINEAR);
// When MINifying the image, use a LINEAR blend of two mipmaps, each filtered LINEARLY too
glTexParameteri(GL_TEXTURE_2D, GL_TEXTURE_MIN_FILTER, GL_LINEAR_MIPMAP_LINEAR);
// Generate mipmaps, by the way.
glGenerateMipmap(GL_TEXTURE_2D);
怎样利用GLFW加载纹理?
我们的loadBMP_custom函数很棒,因为这是我们自己写的!不过用专门的库更好。GLFW就可以加载纹理(仅限TGA文件):
GLuint loadTGA_glfw(const char * imagepath){

    // Create one OpenGL texture
    GLuint textureID;
    glGenTextures(1, &textureID);

    // "Bind" the newly created texture : all future texture functions will modify this texture
    glBindTexture(GL_TEXTURE_2D, textureID);

    // Read the file, call glTexImage2D with the right parameters
    glfwLoadTexture2D(imagepath, 0);

    // Nice trilinear filtering.
    glTexParameteri(GL_TEXTURE_2D, GL_TEXTURE_WRAP_S, GL_REPEAT);
    glTexParameteri(GL_TEXTURE_2D, GL_TEXTURE_WRAP_T, GL_REPEAT);
    glTexParameteri(GL_TEXTURE_2D, GL_TEXTURE_MAG_FILTER, GL_LINEAR);
    glTexParameteri(GL_TEXTURE_2D, GL_TEXTURE_MIN_FILTER, GL_LINEAR_MIPMAP_LINEAR);
    glGenerateMipmap(GL_TEXTURE_2D);

    // Return the ID of the texture we just created
    return textureID;
}
压缩纹理
学到这儿,您可能会问:那JPEG格式的纹理又该怎样加载呢?
简答:用不着考虑这些文件格式,您还有更好的选择。
创建压缩纹理
- 下载The Compressonator,一款ATI工具
- 用它加载一个二次幂纹理
- 将其压缩成DXT1、DXT3或DXT5格式(这些格式之间的差别请参考Wikipedia):
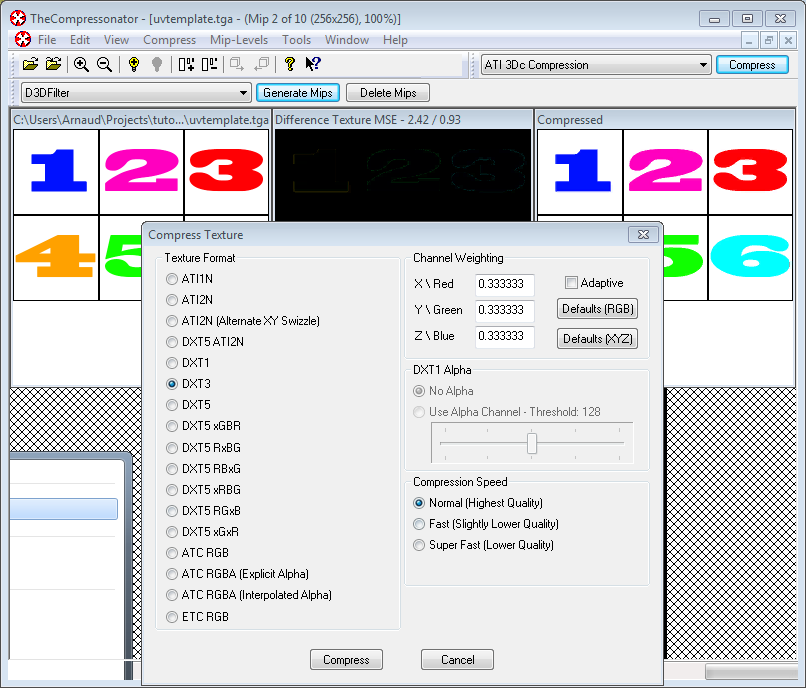
- 生成mipmap,这样就不用在运行时生成mipmap了。
- 导出为.DDS文件。
至此,图像已压缩为可被GPU直接使用的格式。在着色中随时调用texture()均可以实时解压。这一过程看似很慢,但由于它节省了很多内存空间,传输的数据量就少了。传输内存数据开销很大;纹理解压缩却几乎不耗时(有专门的硬件负责此事)。一般情况下,采用压缩纹理可使性能提升20%。
使用压缩纹理
来看看怎样加载压缩纹理。这和加载BMP的代码很相似,只不过文件头的结构不一样:
GLuint loadDDS(const char * imagepath){

    unsigned char header[124];

    FILE *fp;

    /* try to open the file */
    fp = fopen(imagepath, "rb");
    if (fp == NULL)
        return 0;

    /* verify the type of file */
    char filecode[4];
    fread(filecode, 1, 4, fp);
    if (strncmp(filecode, "DDS ", 4) != 0) {
        fclose(fp);
        return 0;
    }

    /* get the surface desc */
    fread(&header, 124, 1, fp);

    unsigned int height      = *(unsigned int*)&(header[8 ]);
    unsigned int width         = *(unsigned int*)&(header[12]);
    unsigned int linearSize     = *(unsigned int*)&(header[16]);
    unsigned int mipMapCount = *(unsigned int*)&(header[24]);
    unsigned int fourCC      = *(unsigned int*)&(header[80]);
文件头之后是真正的数据:紧接着是mipmap层级。可以一次性批量地读取:
    unsigned char * buffer;
    unsigned int bufsize;
    /* how big is it going to be including all mipmaps? */
    bufsize = mipMapCount > 1 ? linearSize * 2 : linearSize;
    buffer = (unsigned char*)malloc(bufsize * sizeof(unsigned char));
    fread(buffer, 1, bufsize, fp);
    /* close the file pointer */
    fclose(fp);
这里要处理三种格式:DXT1、DXT3和DXT5。我们得把”fourCC”标识转换成OpenGL能识别的值。
    unsigned int components  = (fourCC == FOURCC_DXT1) ? 3 : 4;
    unsigned int format;
    switch(fourCC)
    {
    case FOURCC_DXT1:
        format = GL_COMPRESSED_RGBA_S3TC_DXT1_EXT;
        break;
    case FOURCC_DXT3:
        format = GL_COMPRESSED_RGBA_S3TC_DXT3_EXT;
        break;
    case FOURCC_DXT5:
        format = GL_COMPRESSED_RGBA_S3TC_DXT5_EXT;
        break;
    default:
        free(buffer);
        return 0;
    }
像往常一样创建纹理:
    // Create one OpenGL texture
    GLuint textureID;
    glGenTextures(1, &textureID);

    // "Bind" the newly created texture : all future texture functions will modify this texture
    glBindTexture(GL_TEXTURE_2D, textureID);
现在只需逐个填充mipmap:
    unsigned int blockSize = (format == GL_COMPRESSED_RGBA_S3TC_DXT1_EXT) ? 8 : 16;
    unsigned int offset = 0;

    /* load the mipmaps */
    for (unsigned int level = 0; level < mipMapCount && (width || height); ++level)
    {
        unsigned int size = ((width+3)/4)*((height+3)/4)*blockSize;
        glCompressedTexImage2D(GL_TEXTURE_2D, level, format, width, height,
            0, size, buffer + offset);

        offset += size;
        width  /= 2;
        height /= 2;
    }
    free(buffer);

    return textureID;
反转UV坐标
DXT压缩源自DirectX。和OpenGL相比,DirectX中的V纹理坐标是反过来的。所以使用压缩纹理时,得用(coord.v, 1.0-coord.v)来获取正确的纹素。可以在导出脚本、加载器、着色器等环节中执行这步操作
总结
刚才我们学习了创建、加载以及在OpenGL中使用纹理。
总的来说,压缩纹理体积小、加载迅速、使用便捷,应该只用压缩纹理;主要的缺点是得用The Compressonator来转换图像格式。
练习
- 源代码中实现了DDS加载器,但没有做纹理坐标的改动(译者注:指文中讲述的反转 UV坐标)。在适当的位置添加该功能,以使正方体正确显示。
- 试试各种DDS格式。所得结果有何不同?压缩率呢?
- 试试在The Compressonator不生成mipmap。结果如何?请给出3种方案解决这一问题。
参考文献
- Using texture compression in OpenGL , Sébastien Domine, NVIDIA