Tutorial 4 : A Colored Cube
Welcome for the 4rth tutorial ! You will do the following :
- Draw a cube instead of the boring triangle
- Add some fancy colors
- Learn what the Z-Buffer is
Draw a cube
A cube has six square faces. Since OpenGL only knows about triangles, we’ll have to draw 12 triangles : two for each face. We just define our vertices in the same way as we did for the triangle.
// Our vertices. Three consecutive floats give a 3D vertex; Three consecutive vertices give a triangle.
// A cube has 6 faces with 2 triangles each, so this makes 6*2=12 triangles, and 12*3 vertices
static const GLfloat g_vertex_buffer_data[] = {
    -1.0f,-1.0f,-1.0f, // triangle 1 : begin
    -1.0f,-1.0f, 1.0f,
    -1.0f, 1.0f, 1.0f, // triangle 1 : end
    1.0f, 1.0f,-1.0f, // triangle 2 : begin
    -1.0f,-1.0f,-1.0f,
    -1.0f, 1.0f,-1.0f, // triangle 2 : end
    1.0f,-1.0f, 1.0f,
    -1.0f,-1.0f,-1.0f,
    1.0f,-1.0f,-1.0f,
    1.0f, 1.0f,-1.0f,
    1.0f,-1.0f,-1.0f,
    -1.0f,-1.0f,-1.0f,
    -1.0f,-1.0f,-1.0f,
    -1.0f, 1.0f, 1.0f,
    -1.0f, 1.0f,-1.0f,
    1.0f,-1.0f, 1.0f,
    -1.0f,-1.0f, 1.0f,
    -1.0f,-1.0f,-1.0f,
    -1.0f, 1.0f, 1.0f,
    -1.0f,-1.0f, 1.0f,
    1.0f,-1.0f, 1.0f,
    1.0f, 1.0f, 1.0f,
    1.0f,-1.0f,-1.0f,
    1.0f, 1.0f,-1.0f,
    1.0f,-1.0f,-1.0f,
    1.0f, 1.0f, 1.0f,
    1.0f,-1.0f, 1.0f,
    1.0f, 1.0f, 1.0f,
    1.0f, 1.0f,-1.0f,
    -1.0f, 1.0f,-1.0f,
    1.0f, 1.0f, 1.0f,
    -1.0f, 1.0f,-1.0f,
    -1.0f, 1.0f, 1.0f,
    1.0f, 1.0f, 1.0f,
    -1.0f, 1.0f, 1.0f,
    1.0f,-1.0f, 1.0f
};
The OpenGL buffer is created, bound, filled and configured with the standard functions (glGenBuffers, glBindBuffer, glBufferData, glVertexAttribPointer) ; see Tutorial 2 for a quick reminder. The draw call does not change either, you just have to set the right number of vertices that must be drawn :
// Draw the triangle !
glDrawArrays(GL_TRIANGLES, 0, 12*3); // 12*3 indices starting at 0 -> 12 triangles -> 6 squares
A few remarks on this code :
- For now, our 3D model is fixed : in order to change it, you have to modify the source code, recompile the application, and hope for the best. We’ll learn how to load dynamic models in tutorial 7.
- Each vertex is actually written at least 3 times (search “-1.0f,-1.0f,-1.0f” in the code above). This is an awful waste of memory. We’ll learn how to deal with this in tutorial 9.
You now have all the needed pieces to draw the cube in white. Make the shaders work ! go on, at least try :)
Adding colors
A color is, conceptually, exactly the same as a position : it’s just data. In OpenGL terms, they are “attributes”. As a matter of fact, we already used this with glEnableVertexAttribArray() and glVertexAttribPointer(). Let’s add another attribute. The code is going to be very similar.
First, declare your colors : one RGB triplet per vertex. Here I generated some randomly, so the result won’t look that good, but you can do something better, for instance by copying the vertex’s position into its own color.
// One color for each vertex. They were generated randomly.
static const GLfloat g_color_buffer_data[] = {
    0.583f,  0.771f,  0.014f,
    0.609f,  0.115f,  0.436f,
    0.327f,  0.483f,  0.844f,
    0.822f,  0.569f,  0.201f,
    0.435f,  0.602f,  0.223f,
    0.310f,  0.747f,  0.185f,
    0.597f,  0.770f,  0.761f,
    0.559f,  0.436f,  0.730f,
    0.359f,  0.583f,  0.152f,
    0.483f,  0.596f,  0.789f,
    0.559f,  0.861f,  0.639f,
    0.195f,  0.548f,  0.859f,
    0.014f,  0.184f,  0.576f,
    0.771f,  0.328f,  0.970f,
    0.406f,  0.615f,  0.116f,
    0.676f,  0.977f,  0.133f,
    0.971f,  0.572f,  0.833f,
    0.140f,  0.616f,  0.489f,
    0.997f,  0.513f,  0.064f,
    0.945f,  0.719f,  0.592f,
    0.543f,  0.021f,  0.978f,
    0.279f,  0.317f,  0.505f,
    0.167f,  0.620f,  0.077f,
    0.347f,  0.857f,  0.137f,
    0.055f,  0.953f,  0.042f,
    0.714f,  0.505f,  0.345f,
    0.783f,  0.290f,  0.734f,
    0.722f,  0.645f,  0.174f,
    0.302f,  0.455f,  0.848f,
    0.225f,  0.587f,  0.040f,
    0.517f,  0.713f,  0.338f,
    0.053f,  0.959f,  0.120f,
    0.393f,  0.621f,  0.362f,
    0.673f,  0.211f,  0.457f,
    0.820f,  0.883f,  0.371f,
    0.982f,  0.099f,  0.879f
};
The buffer is created, bound and filled in the exact same way as the previous one :
GLuint colorbuffer;
glGenBuffers(1, &colorbuffer);
glBindBuffer(GL_ARRAY_BUFFER, colorbuffer);
glBufferData(GL_ARRAY_BUFFER, sizeof(g_color_buffer_data), g_color_buffer_data, GL_STATIC_DRAW);
The configuration is also identical :
// 2nd attribute buffer : colors
glEnableVertexAttribArray(1);
glBindBuffer(GL_ARRAY_BUFFER, colorbuffer);
glVertexAttribPointer(
    1,                                // attribute. No particular reason for 1, but must match the layout in the shader.
    3,                                // size
    GL_FLOAT,                         // type
    GL_FALSE,                         // normalized?
    0,                                // stride
    (void*)0                          // array buffer offset
);
Now, in the vertex shader, we have access to this additional buffer :
// Notice that the "1" here equals the "1" in glVertexAttribPointer
layout(location = 1) in vec3 vertexColor;
In our case, we won’t do anything fancy with it in the vertex shader. We will simply forward it to the fragment shader :
// Output data ; will be interpolated for each fragment.
out vec3 fragmentColor;

void main(){

    [...]

    // The color of each vertex will be interpolated
    // to produce the color of each fragment
    fragmentColor = vertexColor;
}
In the fragment shader, you declare fragmentColor again :
// Interpolated values from the vertex shaders
in vec3 fragmentColor;
… and copy it in the final output color :
// Ouput data
out vec3 color;

void main(){
    // Output color = color specified in the vertex shader,
    // interpolated between all 3 surrounding vertices
    color = fragmentColor;
}
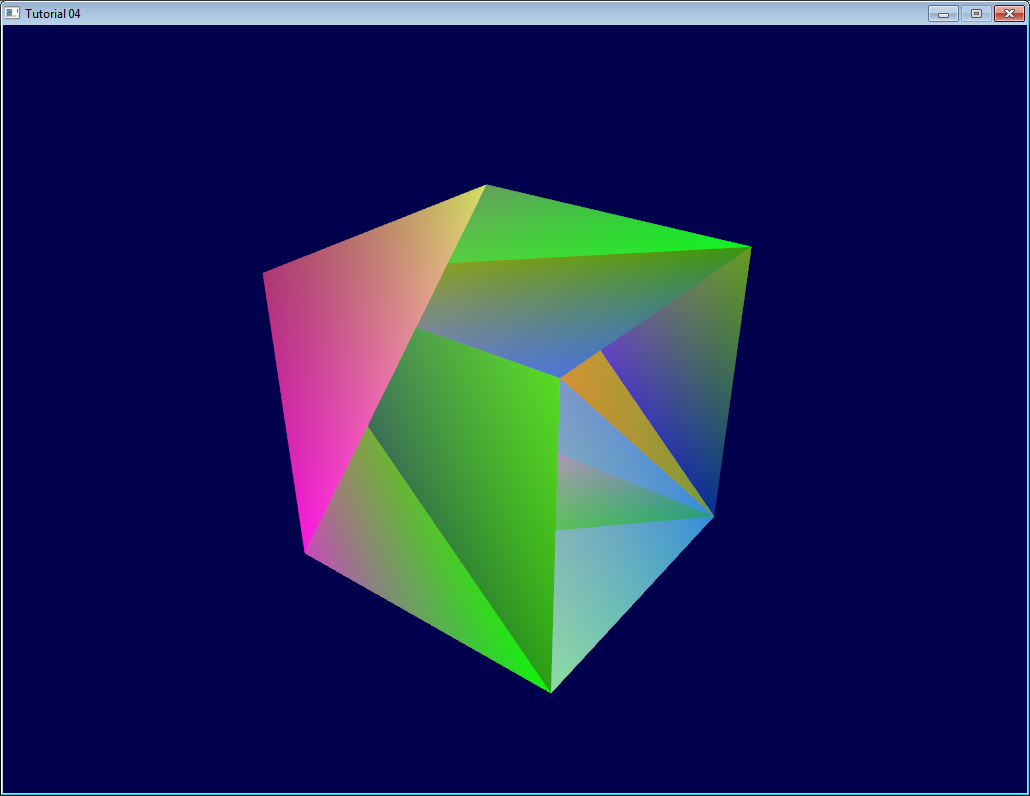
And that’s what we get :

Urgh. Ugly. To understand what happens, here’s what happens when you draw a “far” triangle and a “near” triangle :

Seems OK. Now draw the “far” triangle last :

It overdraws the “near” one, even though it’s supposed to be behind it ! This is what happens with our cube : some faces are supposed to be hidden, but since they are drawn last, they are visible. Let’s call the Z-Buffer to the rescue !
Quick Note 1 : If you don’t see the problem, change your camera position to (4,3,-3)
Quick Note 2 : if “color is like position, it’s an attribute”, why do we need to declare out vec3 fragmentColor; and in vec3 fragmentColor; for the color, and not for the position ? Because the position is actually a bit special : It’s the only thing that is compulsory (or OpenGL wouldn’t know where to draw the triangle !). So in the vertex shader, gl_Position is a “built-in” variable.
The Z-Buffer
The solution to this problem is to store the depth (i.e. “Z”) component of each fragment in a buffer, and each and every time you want to write a fragment, you first check if you should (i.e the new fragment is closer than the previous one).
You can do this yourself, but it’s so much simpler to just ask the hardware to do it itself :
// Enable depth test
glEnable(GL_DEPTH_TEST);
// Accept fragment if it closer to the camera than the former one
glDepthFunc(GL_LESS);
You also need to clear the depth each frame, instead of only the color :
// Clear the screen
glClear(GL_COLOR_BUFFER_BIT | GL_DEPTH_BUFFER_BIT);
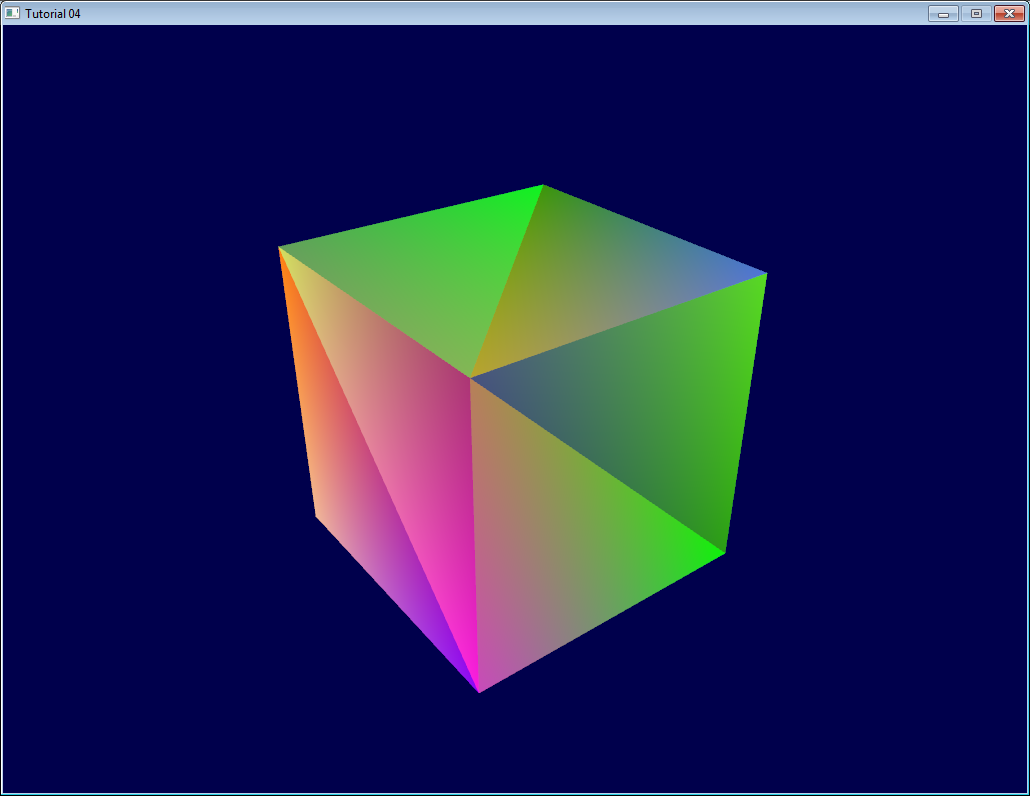
And this is enough to solve all your problems.

Exercises
-
Draw the cube AND the triangle, at different locations. You will need to generate 2 MVP matrices, to make 2 draw calls in the main loop, but only 1 shader is required.
-
Generate the color values yourself. Some ideas : At random, so that colors change at each run; Depending on the position of the vertex; a mix of the two; Some other creative idea :) In case you don’t know C, here’s the syntax :
static GLfloat g_color_buffer_data[12*3*3];
for (int v = 0; v < 12*3 ; v++){
    g_color_buffer_data[3*v+0] = your red color here;
    g_color_buffer_data[3*v+1] = your green color here;
    g_color_buffer_data[3*v+2] = your blue color here;
}
- Once you’ve done that, make the colors change each frame. You’ll have to call glBufferData each frame. Make sure the appropriate buffer is bound (glBindBuffer) before !